40 DIY Projects to Prepare for Baby- Part 2: The Nursery Edition


Before getting pregnant I read about a DIY mom who laid out 40 projects to complete during the 40 weeks of her pregnancy in preparation for the baby. I thought this was such a great idea, and I decided to do the same in getting ready for our daughter! To break up the overwhelming amounts of projects, I am posting them in 4 parts with 10 projects each (that is, if I finish all 40...).

I am only going to post pics of the actual projects that I made, and include links to any tutorials or patterns that I used. So many blogs just link to pics on other sites that look amazing but make me think "there is no way I could ever make that!" From one crafty, but not particularly talented, diyer- all of these project are very doable! 

Note: I also want to put a disclaimer out there that this nursery list is NOT gender neutral. I had this great idea that we would be frugal and make everything gender neutral to be used for all of our kids...and then we found out that we were expecting a girl. Suddenly all of that went out the window, and the nuraery just had to be bright, ruffly, and obnoxiously adorable! Needless to say, if you are expecting a little boy, this list will probably not help you at all.

When looking for the perfect bedding set for the nursery, I must have browsed thousands of designs online. What else is there to do while dreaming of baby? Nothing seemed right until I came across a picture on amazon that was SO adorable, SO perfect, SO girly and bright and fun...and unfortunately SO expensive! 
Carousel Designs Kumari Garden 3-Piece Crib Bedding Set:

$340 for a three piece set? I immediately decided to make my own bedding to look just like it. The fabric is in the line called Kumari Garden by Carousel Designs. I was able to buy the exact same fabric directly from their website. I bought 18 yards of fabric to do the whole nursery for $150. Let's see how far that amount will go in making the most adorable nursery you have ever seen!

1. Crib sheets

I made two crib sheets and they were so simple! They take two yards of fabric each, some elastic and a sewing machine. I used this tutorial from The Ribbon Retreat, and it was a simple starter project to boost my confidence and make me believe that I can actually make this nursery bedding on my own.


2. Changing pad covers

I made two changing pad covers, which are pretty much just a mini version of the crib sheet. I used this tutorial by A Small Snippet.


3. Ruffled Crib Skirt

I was so proud of this! It took a ton of fabric to make, a lot of time, and really serves no logical purpose, but I LOVE this crib skirt. It makes me giddy to see all of those cute little ruffles just overflowing with girly adorableness! While my crib does cover up the third ruffle, I couldn't care less. This skirt is just TOO CUTE for words! I used this tutorial from The Ribbon Retreat. The only change that I made was to use elastic thread to make the ruffles instead of gathering them all by hand. Let me tell you, this will save you HOURS, so go buy some elastic thread and save yourself the frustration.


4. Comforter

This came out so much better than I had imagined. I made it 42 x 56 which is big enough to be a comforter for a toddler bed, so that hopefully she will get a lot of use out of it for years to come. I used this tutorial from Fave Quilts. This was the first "real" quilt that I made that wasn't a rag quilt, and I was so pleased with how it turned out. I added a layer of batting to the middle to make it more of a comforter, and I love the weight of it.


5. Accent Pillow

There was no tutorial or pattern for this one. I bought a 13 x 17 pillow form from Joann's, thought up how I wanted it to look, and my mom and I just pieced it together. I LOVE how it turned out! The front is three pieces of fabric each 6 x 13. We added a 2 inch ruffle on either side of the center piece (again we used the elastic thread which makes ruffles a breeze!), and the back is a solid piece in the same fabric as the ruffle.


6. Window Valance

Once again, no pattern for this one. My mom and I cut a piece of fabric 2 1/2 times the width of the window, made a three inch wide casing with a coordinating fabric and added a three inch heading on top to form the ruffle. Seamed it up, and it was a simple project with a stunning outcome!


7. Wooden Initial Wall Art

I don't have a tutorial for this one, but it is pretty simple- there is no right or wrong way to make one! I bought the large wooden initial on the clearance aisle at Michael's for $3! I painted it in the same pink as her nursery fabric, wrapped some yarn around some parts, hot glued on some buttons, felt shapes, and ribbon flowers, and finished the whole project in about an hour. It fills the empty wall next to the window perfectly, and I couldn't be happier with the final product!


8. Name Canvas Wall Art

I used some spray-on fabric adhesive to attach some nursery fabric to a canvas, painted some wooden letters for her name, wrapped some yarn in coordinating colors, and added the felt and button accents. After that, I simply hot-glued the letters to the canvas! Once she arrives, I will be adding her date of birth in the lower right hand corner. I only wish I knew what that date would be!!!


9. Felt Flower Canvas Art

I had seen several pictures of these felt dahlias on canvases on Pinterest and loved them, but could never find a tutorial! No worries- I put together a tutorial here in case you are interested in making your own :) I covered two canvases with the nursery fabric and then hot glued the felt dahlias on top to hang on either side of her name canvas. The three together look fabulous on the wall above her dresser!


10. No-Sew Baby Name Pennant Banner

No tutorial link for this one, but it is pretty self-explanatory. I made pennants out of felt, cut out felt letters in alternating colors, and then used iron-on fabric adhesive to apply them. Next I cut out alternating sizes of triangles in the nursery fabric to put in between the pennants just to tie everything together. I hot glued the the pennants to a piece of ribbon and then added some tulle and ribbon to make the bows and accents. It looks perfect hanging above the crib!


Just to do a quick run-down of how much I saved by making the nursery bedding and accessories instead of buying them on etsy, here is what they would have cost:
Crib sheets (2)- $35 each    $70 total
Changing pad covers (2)- $30 each     $60 total
Ruffled bed skirt- $150
Comforter- $175
Accent pillow- $35
Window Valance- $35
Pennant banner- $25
Canvas wall art with name and felt flowers- $150

The total cost would have been $700, but instead I paid $150 for fabric and another $20 on paint, letters, felt, etc. Oh, and I also spent hours and hours making it all, but I count that as fun! Overall, I think her gorgeous nursery was worth every penny!
All we need to add now is one sweet little girl! 

If you missed Part 1, be sure to check out all the basic projects for just getting started!

Felt Dahlia Flower Tutorial

I saw some pictures of a felt dahlia flower on a canvas on pinterest and wanted to make a few to hang in my daughter's nursery. Unfortunately I couldn't find a tutorial on how to make it, so I played around with it for a while until I found what worked for me. It is pretty simple, so here's how to do your own!

First I covered a canvas in fabric using a spray on adhesive.  Next I cut out all of my felt pieces. My canvas was 12 x 12, so if yours is a different size, keep in mind that you will need to change the sizes of your felt pieces to make the flower larger or smaller. 

For the first two outer rows of petals, I cut rectangles that were 3in x 4in. Fold each rectangle in half lengthwise and cut a rounded corner going down about 1/3 of the length of the rectangle. This will form the tip to each petal.


Next, hot glue the flat end of each petal into an accordion "M"shape with each corner and the middle of each petal glued together. 


Next, hot glue 8 petals evenly spaced with the edges of the petals reaching out to the size that you want the finished flower to be.


Add a second layer of 8 petals with the new ones overlapping on top but set in slightly towards the center of the circle. Each new petal should fit right in between the first layer of petals to form a layered look.


For the last row of petals, use a slightly smaller size of felt. I used 2in x 3in rectangles to make the inner petals. Continue to hot glue them in between the other petals set in slightly with each row. You may need to add several more rows depending on the size of your flower.


Now for the center! This can be a little tricky. Make a star-shaped piece of felt and some even smaller petals. I used 1in x 2in rectangles for the center. Glue the four corners of your star together.

Flip the star over and hot glue each of the four center petals into one of the open corners of the star.


Glue this piece into the center of your flower, making sure that it covers up all the edges of the inner circle of petals. I wanted the center of the flower to look a little more closed, so I hot glued some of the edges of the center petals together.


That's it! The whole project didn't take long at all, and I was so pleased with how it turned out! 
Get out your glue gun and go to town :)

40 DIY Projects to Prepare for Baby- Part 1: The Basics


Before getting pregnant I read about a DIY mom who laid out 40 projects to complete during the 40 weeks of her pregnancy in preparation for the baby. I thought this was such a great idea, and I decided to do the same in getting ready for our daughter! I quickly learned that 40 projects is A LOT to create, and completing one project per week is an absolute joke! I completed zero projects during my first trimester when I was very busy with work and had no energy- ugh, that first trimester blah.... Most of the projects took place during my second trimester, in that burst of nesting energy that just happened to coincide with Thanksgiving and Christmas breaks at work giving me extra time to create :) 

I am only going to post pics of the actual projects that I made, and include links to any tutorials or patterns that I used. So many blogs just link to pics on other sites that look amazing but make me think "there is no way I could ever make that!" From one crafty, but not particularly talented, diyer- all of these projects are very doable! 

To break up the overwhelming amounts of projects, I am posting them in 4 parts with 10 projects each (that is, if I really do finish all 40...). This first list contains some basic projects that you can make in the beginning- things you will need for any baby and can easily make gender neutral since you won't know yet if you are going to have a girl or boy.

Enough chatting- on to the list!

1. Contoured Burp Cloths

From what I have read, you can't have enough of these! My sister never used a single one on her son, but I think she has the neatest child on the planet, and that is unlikely to duplicate itself in my daughter. I am prepared for spit up! These were so easy to make! I make a dozen of them (four of each of the three different fabric patterns). I used the free pattern from Floating on Cloud9. The only change that I made was to make both sides flannel, rather than cotton on one side and flannel on the other. Many moms had commented that the cotton didn't absorb well, and that kind of defeats the purpose of a burp cloth! I am so pleased with how they turned out. I bought the flannel at Joann's the day after thanksgiving for 70% off, and the total cost to make 12 was $4. In the store burp cloths run about $1 each, so I saved $8 (and mine are super cute!).


2. Cloth wipes

Yes, we are planning on cloth diapering. From everything that I have read, ti is easier to use cloth wipes with cloth diapers because they can all go in the same bag to be washed instead of having to separate the wipes into a separate trash can. But the price of cloth wipes is outrageous! They run about fifty cents each, and to have a good stash you need around 50. That adds up pretty quick considering it is just a cloth to wipe a baby's behind. These cloth wipes were so easy to make- they are 8 x 8 inch squares of flannel that I serged around the edges. If you don't have a serger, a plain zigzag or overlock stick on a regular sewing machine will do the job. You will get 20 wipes out of each yard of flannel that you buy (or if you do 7 x 7 inch squares, you can get 25 wipes per yard). I bought the flannel on sale and made 50 cloth wipes for $4. To buy them would have cost $25, so I saved $21).

Note: After making these I realized that they can be used for SO MANY THINGS! Wiping runny noses, sticky hands, or spills, I have a feeling that I am going to wear this set out pretty quickly and need to make more!


3. Nursing pads

Once again, I wanted to have a reusable option for this item rather that using disposables. I used the free printable pattern from DIY Maternity but didn't sew in the darts (it would have made it way too thick). I didn't follow their directions for making them either- instead I used three layers: flannel to go against the skin for wicking away moisture, a layer of Zorb in the middle to hold any leaks, and and an outer layer of fleece to keep moisture from soaking through onto clothing. I layered the three fabrics and serged around the edge- super simple! Zorb is a special super absorbent fabric that absorbs the same amount as ten layers of flannel! I ordered mine by the yard on etsy (it runs about $10/yard). Again, to buy these at the store is really expensive. On average they run about $7 per set! I made 12 sets, which used 1/4 yard of each of my three fabrics, costing a total of $4. (I saved $80!!!)


4. Rag Quilt

This is such a cute baby blanket, and really easy to put together. I had never made a quilt before, and this one turned out great! I followed the tutorial by Do It Yourself Divas. The only change that I made was to add a layer of fleece to the middle of the blanket. I wanted to use it as a blanket that I could put down on our hard wood floors for the baby to play on and the fleece added just the right amount of weight and cushion.


5. Knitted Baby Blanket

I love to knit, so of course I have to knit a baby blanket! After looking at a lot of different designs, I finally settled on this pattern by All Free Knitting. The only change I made was to make it 5 x 5 squares instead of 5 x 7.


6. Bibs

Bibs are an essential, so why not have some soft, cuddle, and cute ones? I used this pattern and tutorial from Life with my Littles. The only difference is that I used two layers of flannel to make mine instead of using cotton and minky. This was another really easy project to whip out in an afternoon, and I made half a dozen. Bibs cost $2 each, and these cost me $2, for a savings of $10.


7. Taggie Toys

These taggie toys are so cute! And what better way to use up all of the little ribbon scraps I have left over from other projects! I used this pattern and tutorial from Beloved Ones to make the dinosaur, and it is adorable! I hope that I have time to make this owl and this giraffe :)


8. Wash Cloths

I was originally going to make my own washcloths by cutting squares of terry cloth and backing it with flannel, but then I ran across a four pack of baby washcloths at the dollar store. I loved that they came in a variety of colors, so I bought two boxes. I cut out flannel pieces to match, sewed right sides together, turned then right side out and top stitched to complete. The weight turned out just right, and they made for a quick and easy bunch of washcloths. If you are looking for a more detailed tutorial, there is a great one at 2 Little Hooligans. Washcloths cost about $1.50 each, and I made 8 for $3, for a savings of $9.


9. Door Latch Cover

 So this item slips over the door handles and holds down the latch so that you can open and close the door without the click waking the baby. I used this tutorial from Practically Functional. The first one I made with just cotton fabric was too thin to hold down the door latch, so I added a layer of flannel in the middle to give it more weight. That did the trick! I'm not sure how necessary this item is, but it took five minutes and some scrap fabric to put together, so it's worth a try!


10. Baby Accessories Hanger

I'm sure I saw this idea somewhere, but I really can;t remember where. This baby accessories hanger is so easy to put together and is a simple way to keep all of the little hats, mittens, and shoes together in a place where you can easily see and access them. All you do is buy a pack of shower curtain rings with the clips, loop a ribbon around each one and a sturdy pants hanger, and voila! Now you can hang all of those little items in the closet instead of taking up a drawer where they all get jumbled up together.


To see the next set of projects, see Part 2- The Nursery Edition!

Homemade Taco Seasoning Mix


When I think about how much money I spend on those little packets on seasoning mixes, it makes me cringe. Not to mention that I don't really know what is in them. After looking at several recipes for DIY taco seasoning mix, I decided to give it a try and see if I could taste a difference. 

Here is what I discovered...
1) This stuff is so easy to mix together
2) The flavor is so much better that the packets!!!
I will not go back to the store bought stuff. Ever.


There are lots of seasoning combinations out there, but here's the recipe that I settled on.
What you need:
- 1 tbsp chili powder
- 1 1/2 tsp cumin
- 1 tsp salt
- 1 tsp pepper
- 1/2 tsp paprika
- 1/2 tsp oregano
- 1/2 tsp garlic powder
- 1/4 tsp onion powder
- 1/4 tsp cayenne pepper


Simply mix all of the ingredients together and store in an airtight glass container. Feel free to make several batches to fill whatever size container you use. Use 1-2 tbsp of mix per pound of meat depending on how seasoned you prefer it. Let me just tell you- you will taste a huge difference. This recipe is so packed with flavor! I just love finding better ways to do things, and less expensive with more flavor seems like a double win to me :)

DIY Mint Extract


Last spring I bought a few tiny mint plants and put them on the edge of a raised bed in my vegetable garden. I heard that mint grows easily...aka is very invasive and aggressively takes over everything. In the fall it was out of control and I pulled it all up. Or so I thought. It came back- this time growing between the bricks in the pathway. That's ok, I thought. It smells nice when I step on it, and it isn't taking up any garden space. Wrong. It has sent its runners into every adjacent garden and is now impossible to get rid of. So this morning I pulled a bunch up (1 lb. to be exact- yes, a full pound of mint, and that doesn't even put a dent in it) and decided to make something useful out of it.

Mint extract!

The process is very simple. 

1. Pull up the overwhelming amounts of mint taking over your yard.


2. Pull off all of the leaves that don't have brown spots or edges.

3. Wash the leaves and dry them using a salad spinner.


4. Put the leaves into a glass jar and crush the leaves to release their minty goodness. I used a butter knife to pierce and crush them.


5. Pour Vodka over the leaves until they are covered.  Seal the jar, give it a good shake, and place it in a cool dark place for six weeks (remembering to shake it every now and then).


6. Strain the leaves out of the mixture and use as you would mint extract bought from the store!

I am looking forward to mint shakes, ice cream, and cookies! But mostly, I am looking forward to reclaiming my garden from the encroaching mint takeover...


DIY Rain Chain

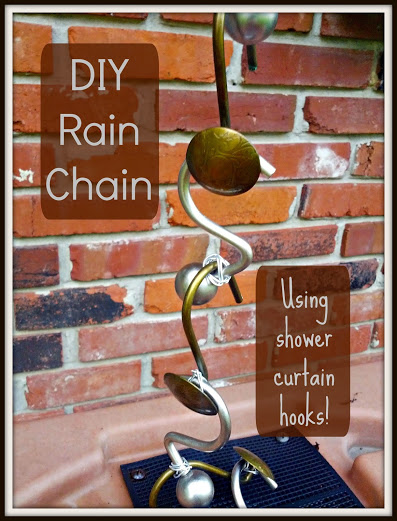
Last weekend we put up gutters on the house and I wanted a creative and beautiful way to get the water from the downspout into the water barrel in my vegetable garden. What better than a rain chain? A rain chain is a decorative chain that directs the water down without too much splashing. Rain chains can be very expensive, but I'm bot inclined to spend much money garden decor... or anything really. So I began scrounging around the house for something that I could turn into a rain chain, and I found the perfect thing! 

Shower curtain hooks! 

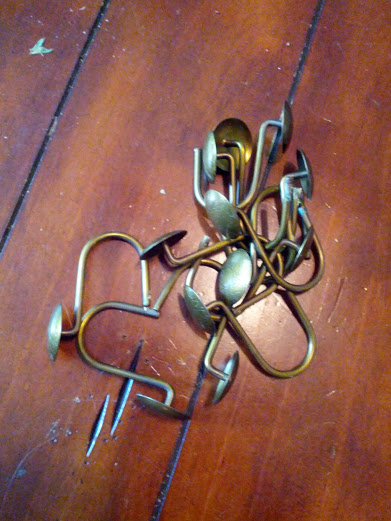
I just happened to have two extra sets of shower curtain hooks in the back of a drawer. I think I got them at goodwill for $2 per set. You never know when you will need a set of shower curtain hooks, and it turns out that I needed them for this project!

They are perfect because they are metal, which means they are heavy enough to keep from blowing in the wind, they are made to go in the shower, which means they won't rust when wet, and they are hooks, which means it is really easy to link them together to make a chain.

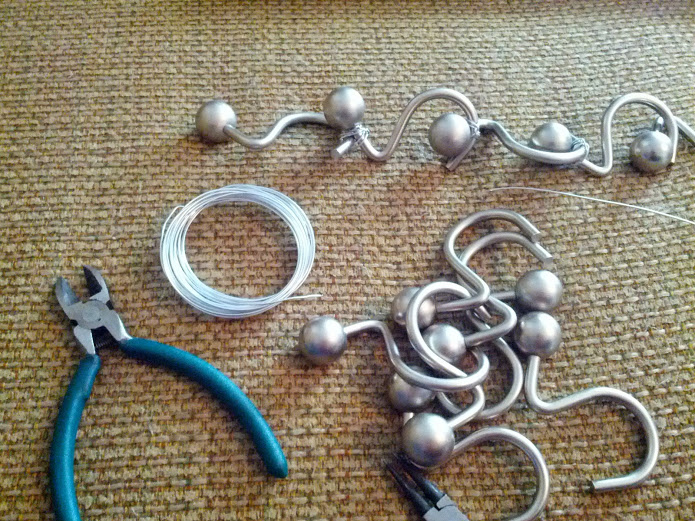
This was really easy to make- it literally took about 15 minutes. I simply linked the shower curtain hooks together and used some wire to secure each connection so that they don't become disconnected in the wind (we do get hurricanes).  We hung it from the downspout and lined it up with the grate on the rain barrel.

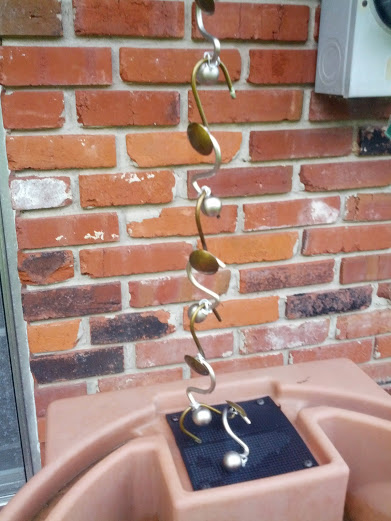
I couldn't happier with the result! Not only is it beautiful and functional, but it also cost less than it would have to buy that ugly plastic down spout. Can't beat that!


DIY Decorative Magnetic Chalkboard

This has been one of my favorite projects that I have made this year! It is a magnetic chalkboard in a decorative frame with a touch of shabby chic-ness! There are quite a few steps to make this, but here goes...

What you need:

- wooden plate frame

- plaster of paris

- acrylic paint

- paintbrush

- sandpaper or sanding block

- 9 in. baking tin

- chalkboard spray paint

- chalk

- ribbon

- decorative fabric flower, feathers beads, etc.

First you will need a wooden plate frame. A family member of mine used to collect those painted plates with scenes from different movies, etc. Well, to go along with these collector plates, they had boxes of wooden plate frames. So, you will need one wooden collector plate frame.

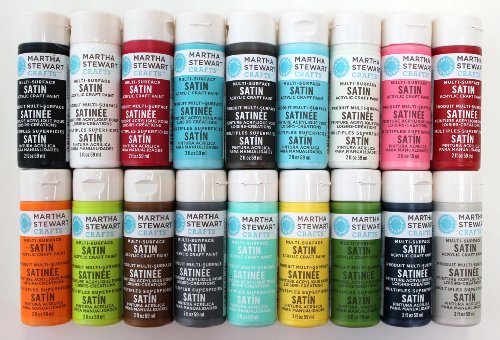
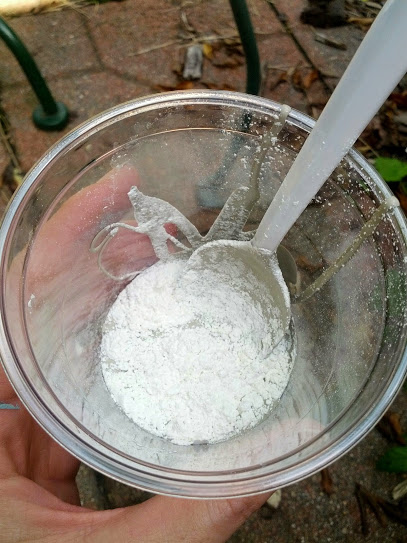
Lay your frame on some newspaper. Now it is time to paint it with some homemade chalk paint. You can buy chalk paint, but mixing your own is cheaper, and you can choose from any color of paint! To make chalk paint, simply mix your choice color of paint with a little bit of plaster of paris. I couldn't tell you the proportions because I usually just go by the consistency, which is different for each paint. You don't want it so chalky that it is clumpy- it should still be smooth, but thicker than regular paint.

Once your chalk paint is mixed, put a thick coat on your frame. Only one coat of paint should be necessary with the chalk paint. Don't get too perfectionistic with your paint job, you are going to be sanding it off in the next step anyway! Let it dry completely.

Now take some fine grained sandpaper or a sanding block and sand down the chalk paint so that the wood shows through along the edges of the frame. This should look like natural weathering, so it will be uneven and rustic looking. Be sure to use the wood's natural rises to your advantage to give it more depth. Here are two frames side by side of before and after the sanding.

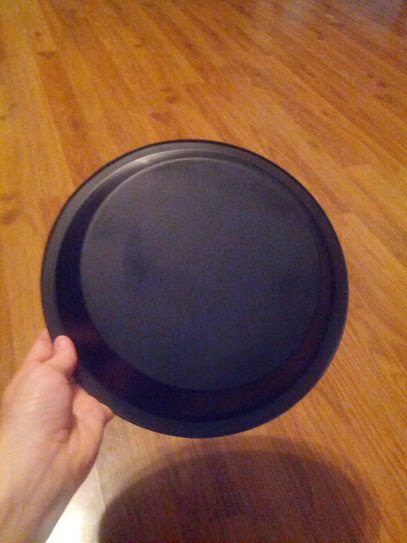
Brush off the paint dust and get ready to make the chalkboard part! What makes the adorable magnetic chalkboard center of this decorative frame? A simple dollar store 9 in. baking tin.

Take your baking dish and spray paint the back side of it with chalkboard paint. Make sure the pan is completely covered with a thick coat of paint. It is better to do several thin coats letting each coat dry before adding the next to get the best effect.

Then attach the baking tin to the frame. The frames already come with hardware on them. I take all of it off, saving the screws and the hanger to use again later. Use a hammer and nail to punch five holes in the lip of the baking tin- one on each side, one at the bottom, and two at the top the exact distance of the holes in the hanging hardware. 

Use the screws saved from before to screw the baking tin into the frame with a hand held screwdriver.

Now you should have a completed frame!

Next you can add any decorative touches that you want. I use fabric flowers, beads, and feathers. Hot glue your decorative touches to the frame. I also add a piece of chalk tied to a ribbon that is glued to the frame so that something to write with is always handy!

There are lots of different designs that you can make using these plates frames. The magnetic chalkboard is my favorite, but I have tried several other designs as well.

You can use sheets of cork to create a corkboard.

Or you can slice wine corks and glue them onto fabric covered cardboard to create a corkboard with a little more dimension.

I think these plate frames are the perfect decorative touch for any home as well as keeping organized! Which one will you make?

DIY Picket Fence Boot Rack


Our latest little homestead project was making a boot rack to organize all of our outdoor shoes that tend to pile up by the back door. Since our chickens free range, the shoes that we wear in the backyard, are used ONLY for the back yard. So when we take them off at the door, it turns into a piled mess of old tennis shoes, boots and flip flops. Enter new idea for a boot rack to keep it organized so I don't trip over them getting to the door :)

We used some leftover supplies that we had leftover from other projects, so it isn't for looks- just function at this point.

Supplies:
- 1 part of a section of picket fence
- 2 2x4x8 boards
- 3 fence boards
- wood screws

First we cut the section of picket fencing we had leftover so that it was only 4 pickets long. Next, I custom measured pieces of the 2x4 to go out from the fence at the bottom to equal the width of 2 fence boards. Then I measured 2 more pieces to use as vertical stabilizers and screwed them all together.

Next I cut 2 of the fence boards to the length of the base and screwed them on top (actually DH handled all of the power tools).


 Next we cut some short pieces of 2x4 to create the brace for the top shelf. We measured so that it would equal the width of one fence board, and then screwed them together.


 We added the top shelf onto the supports, and then added a screw into the back of each picket to make the whole thing a little more sturdy.


 All done! Took less than half an hour! Not bad for a Saturday afternoon project. I will probably paint it later...maybe next Saturday.


Fabric Paint Stamped Tea Towel

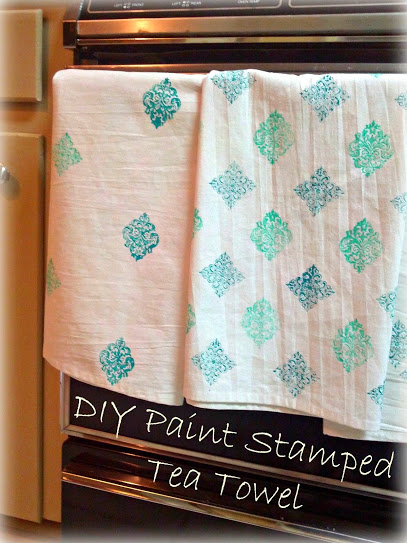
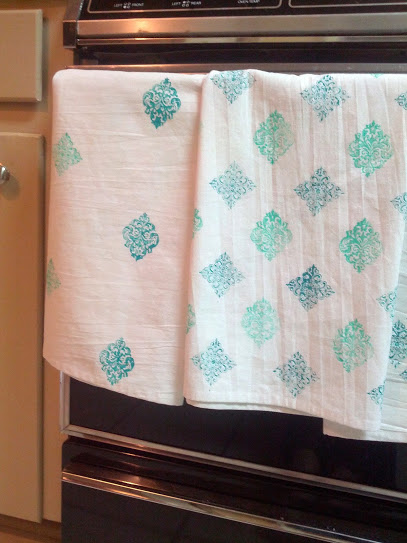
A friend of mine has an adorable house, and it is difficult to give a decorative gift to someone with an adorable house, because everything always looks perfect! If you need a gift for a person like this, don't give up and buy a gift card just yet! These super cute and trendy fabric stamped tea towels are a great idea. They are custom made, so you can fit the colors and designs to any decor, and even a non-crafty person can create a memorable gift for

yourself

 a friend.

What you need:

- Cotton linen tea towels

- Martha Stewart Tintable Fabric Medium

- Acrylic paint

- Rubber stamps

- Ruler

- Pencil

- Foam brush

- Waxed paper

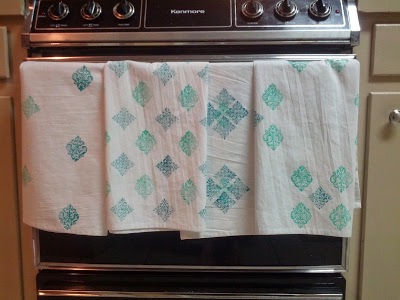
To make these adorable stamped tea towels is an easy project. First gather all your supplies- choose which paint colors you want to use and which designs of stamps. Next think through the design that you want to put on the towels (the possibilities are endless!). I did four different designs for this particular project. 

First pre-wash, dry, and iron the towels to have a clean surface to design. Next, lay out the design. I measured where each stamp would go in advance, and marked those spots with a pencil, making a tiny dot.

I also put my towel on top of a plastic tablecloth, just in case any paint bled through!

Take your first color of paint and mix it with the tintable fabric medium. Make sure to shake both well before using. When mixing the two together use a 1 to 1 ratio of paint to fabric medium.

After you mix the paint, I use a foam brush to paint it onto the shiny side of waxed paper. I then put the stamp into the paint on the paper to make sure that the paint is evenly coated on the stamp before stamping it onto the fabric. You could also paint it onto the stamp with a brush, but I like the waxed paper method.

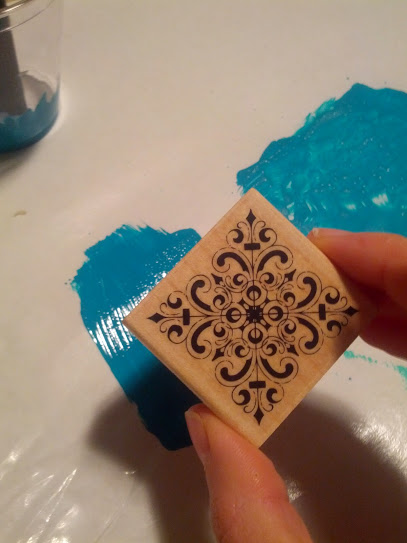
Carefully stamp your design where the dots are marked, making sure to recoat the stamp with paint in between each stamp on the towel. You may want to practice stamping the paint on paper before you go to the fabric, just to get the hang of it!

Use as many colors and designs as you would like! Cleanup between colors is easy- just rinse out your stamp and brush with warm water. Since the paint is acrylic, rinsing it off is a breeze!

Once you are finished, let the towels dry for 24 hours. I know...waiting. 

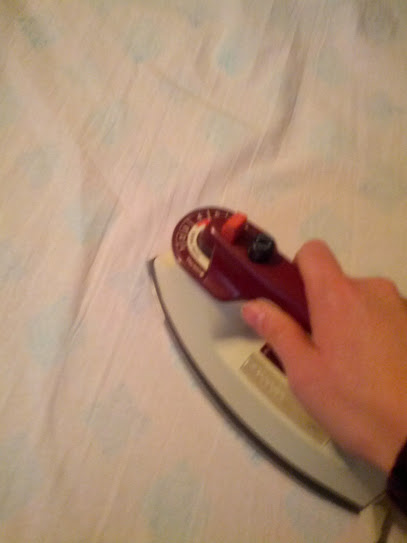
After that, you have to heat set the designs to make them permanent. This is the most boring part. Iron on the wrong side of the fabric using a DRY iron (steam could smear the design) set on medium to high heat.  Iron in small sections, making sure that each section is heated evenly for 3-5 minutes. Yes, add up those minutes in your head and you will realize that 4 towels took over an hour. So, put on some music or a movie, get comfy, and iron away.  

Once the design is heat set, the towels are finished! The are machine washable and dryable on the delicate cycle. Now these tea towels are ready to take your kitchen cuteness to the next level! The great thing about this project is that you can use this same method on anything fabric- pillow cases, shower curtains, table runners, cloth napkins, curtains, throw pillows, table cloths, lampshades, Christmas tree skirts, etc. So once your kitchen is cute, start custom designing everything else in the house!

How did yours come out???

DIY Photo Transfer Tea Towel

One of the many Christmas presents that I decided to make this year were photo transfer Tea Towels! I saw some on pinterest that were so cute, to I made a ton of them for gifts this year, and they turned out great! Let me show you how it works.

First print out ANY image- color or black and white, graphic or photo, etc- on a LASER printer. This will not work with an inkjet, so make sure its laser. If you are printing anything with words, make sure you print the mirror image so it comes out right in the end.

Next, cut out your image to exactly what you want transferred to the towel. Keep in mind that even the negative space, or white parts of the picture in this case, will transfer on to the towel. So if you are using a colored towel instead of a white one, the negative space may look a little funny.

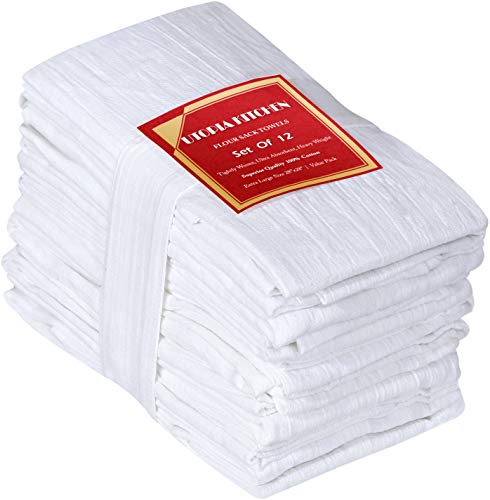
Next, iron out your towel. Mine are also pre-washed and dried. I used Aunt Martha's flour sack towels. They have that vintage look and feel to them without being super pricey. 

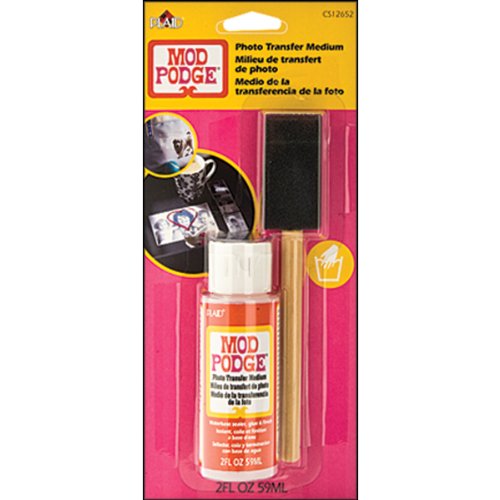
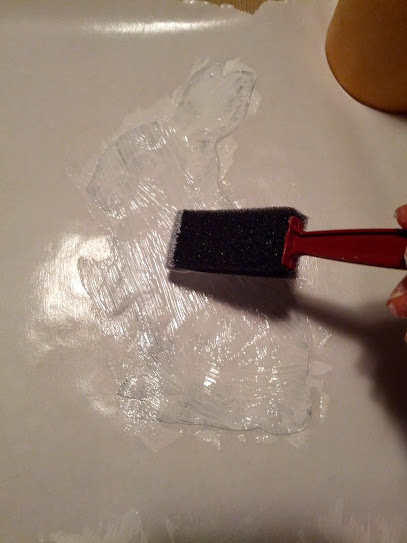
Now for the secret sauce! You are going to use Mod Podge photo transfer medium to work your magic. It comes in 2 ounce or 8 ounce bottles.

Lay your image on a piece of wax paper.

Glob on a bunch of the Mod Podge...

And then use a foam brush to cover the entire image with a THICK coat. It should be 1/16" thick and cover the entire image.

Next, carefully take the image off of the wax paper touching only the back and sides of the image. Lay it on your tea towel mod podge side down. Start in the center smoothing out your image, making sure there are no air bubbles. Make sure all of the edges are stuck down well, and if any of the mod podge squishes out the sides, wipe it off with a damp towel.

Now wait at least 24 hours for it to dry completely. I live in south Louisiana where our humidity was 98% the day of the project, so I waited 36 hours just to be safe, and it turned out great.

Next use a water and  a sponge to wet the entire surface of the image. Let the water soak in for two minutes.

After two minutes, rub the sponge over the surface of the image in a circular motion to rub off the paper.

Make sure that all of the paper is removed. If you rub your fingers over the image and paper pieces are still rolling off, then keep scrubbing. 

Once all the paper is removed, let the image cure for 72 hours. After this time period, your towel can be machine washed and dried, just make sure to not dry clean it or iron over the image.

Now, you're done! Enjoy sprucing up your kitchen with a personal touch or giving a gift that is handmade!

DIY Photo Block Tutorial


I enjoy making presents for as many people on my Christmas list as possible. Let's face it, some people just really want a gift card, but I get a lot more enjoyment out of creating something that I think they will enjoy. All three of my roommates from college had babies this year, so I will be sending each of them a Baby Photo Block. They are really cute, personal, and easy to make, so I thought I would share the idea :)

What you need:
- a 2x4 piece of wood (will make lots!)
- a saw (hooray for power tools)
- acrylic paint
- printed 4x6 photo
- Mod Podge
- paint brush
- tulle or ribbon
- Sharpie

First, take a 2x4 and cut it into 4" long pieces to make the blocks. Then paint each of the blocks in the color of your choice.


Next, get a printed copy of a picture- it could be baby, graduation, wedding, birthday, etc. In this case, I have three adorable baby pictures. Cut each picture slightly smaller than the size of the block so that you can see just a little bit of the paint around the edges of the picture.

Now grab your handy Mod Podge! Use a paint brush to coat the back of each picture and paste it to the block. Then I painted three coats over the front of the picture to seal it and protect it. Make sure to let each coat dry completely before adding the next.


Once they have dried, use a Sharpie to write a message on the back. It could be a verse, a memory, a special date, etc. In this case, I wrote the baby's name, birthday, weight, and length (not shown for privacy reasons).

Finally, wrap ribbon, fabric, or tulle around the edge and make a bow on top to finish it off for display!


I hope they don't stumble upon this post before Christmas, or it will spoil the surprise! I hope you have fun crafting for Christmas this year!

DIY Ribbon Headband Holder Tutorial (No Sew!)

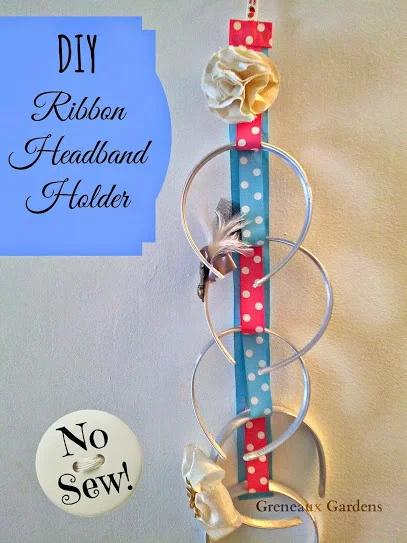
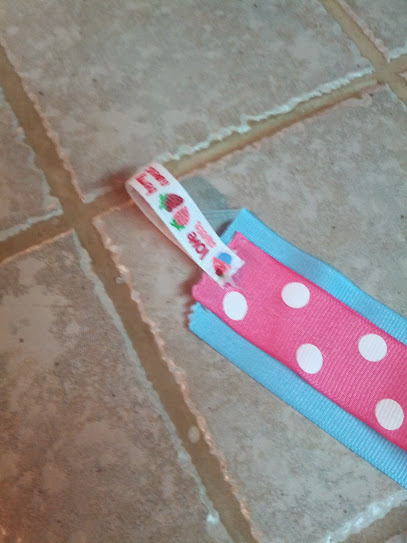
I recently pinned a DIY Ribbon Headband Holder that someone had made and was selling on etsy for $20. I don't think so! Immediately I knew I had to make some to give as gifts to nieces, etc. It didn't take long for me to create my own version, and it was so simple that I can't wait to share it with you so that you can make one for yourself :)
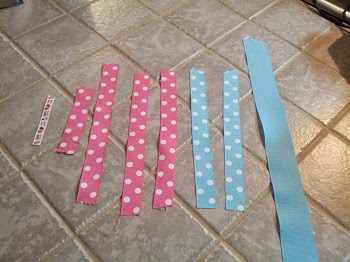
Materials:

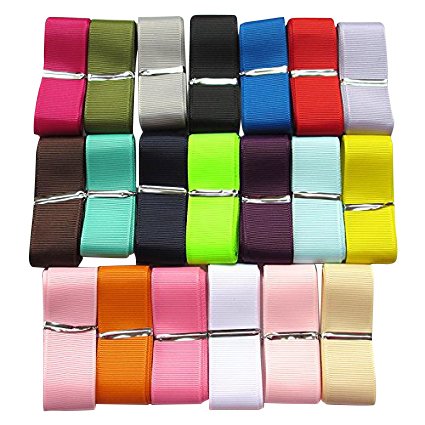
3" of 1/4" wide grosgrain ribbon 

4" of 1" wide grosgrain ribbon

5 pieces of 9" long 1" wide grosgrain ribbon

24" of 2" wide grosgrain ribbon

hot glue gun

metal key ring

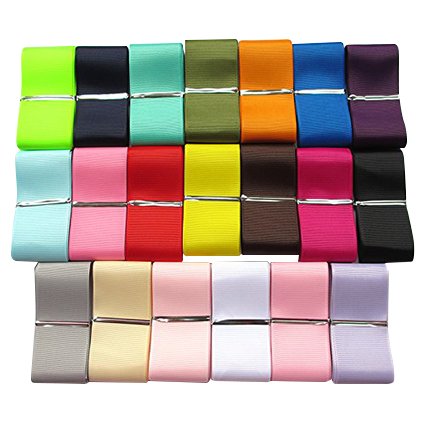
*choose any color combinations of ribbons that you want!

Tutorial:

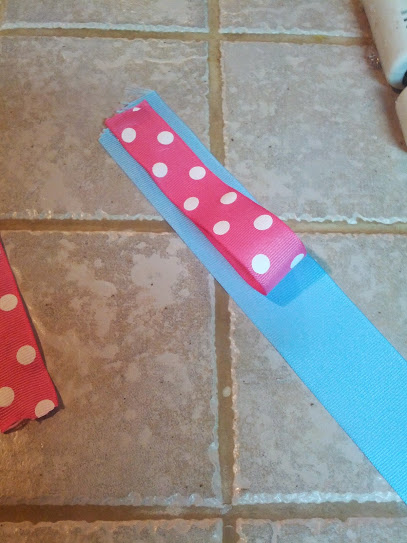
Begin by ironing your ribbon as grosgrain ribbon creases easily. Next, hot glue  the edges of each of the five pieces of ribbon to create loops.

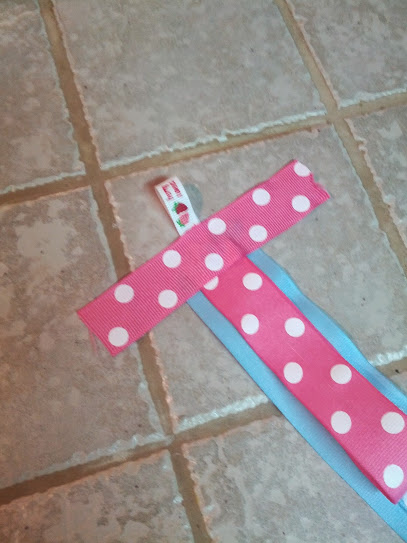
Put hot glue along the top edge of the first loop and glue it centered on the base 2" wide ribbon. Next, flip the loop upside down and put a line of hot glue along 2/3 of the length of the ribbon and stick it down to the base ribbon.

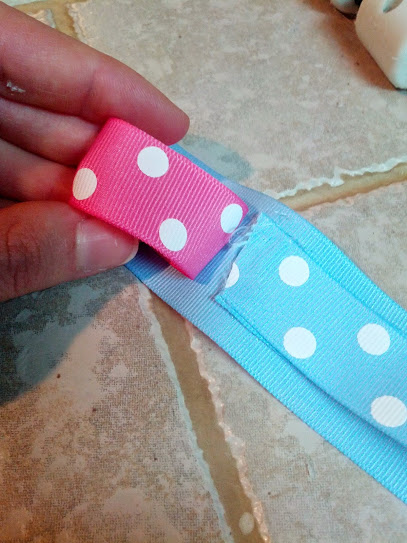
Put a line of glue along the top of the next loop and glue it onto the base ribbon so that the edge of the loop just fits underneath the end of the loop before it. Add the line of glue 2/3 of the length to secure it to the base ribbon, and continue this process until all five loops have been added along the base ribbon.

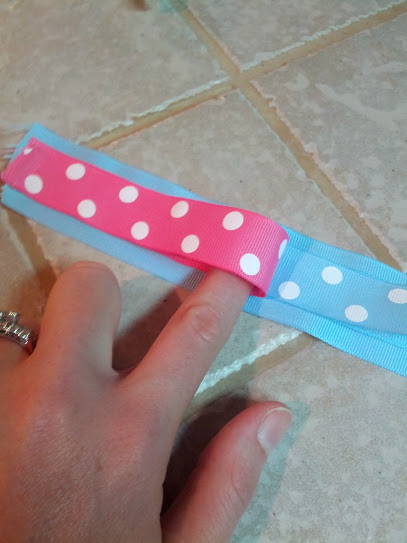
Once all the loops are attached, put a thick line of glue to the top of each loop and press down firmly with your finger to connect the base of the loop above it.

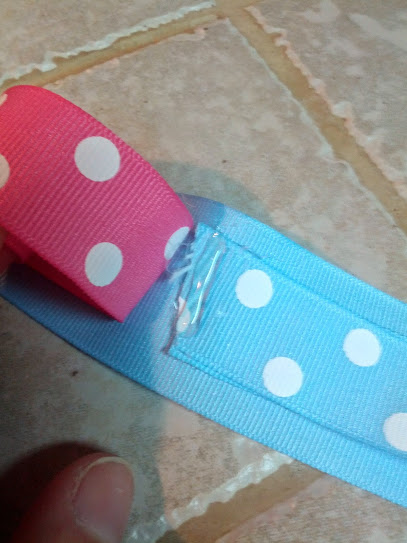
Glue the 1/4" ribbon into a loop and then glue it to the top front of the ribbon.

Glue the 4" piece of 1" wide ribbon lengthwise across the top

of the base ribbon, but slightly above the top edge.

Flip the base ribbon over and glue each side of the ribbon down to enclose the top for no raveling.

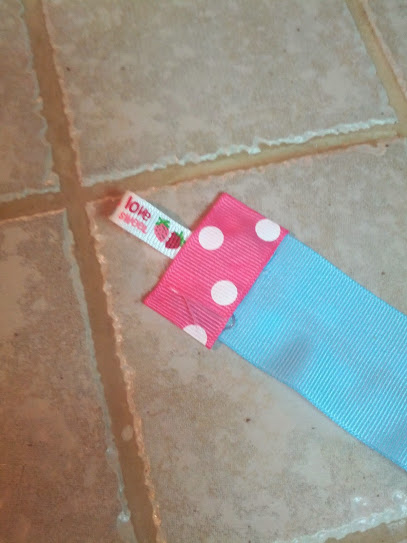
To finish the bottom edge, just hot glue the edge under to make a short seam on the back of the ribbon.

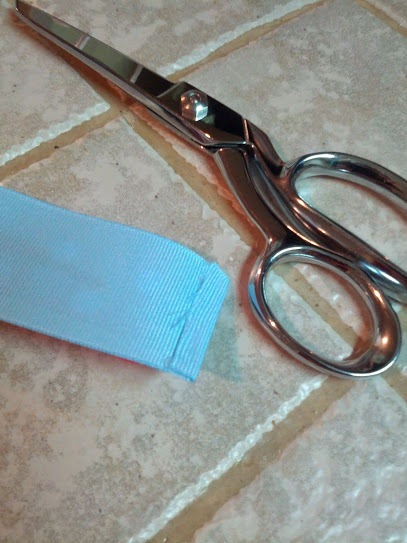
And now all you have to do is pull off all of those annoying glue strings from the hot glue gun, put your metal key ring through the loop, and hang up your creation for organized headbands!

Happy creating and gifting!


DIY Plant Markers

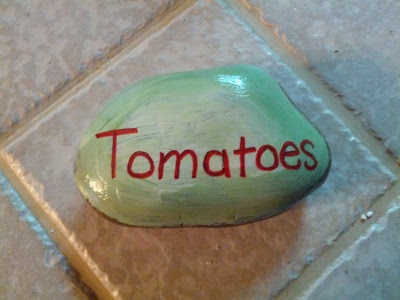
DIY Plant Markers for the Garden

I was looking for a way to marks the rows in my vegetable garden that was colorful but not cheesy and wouldn't constantly get blown over. This is so easy, and it came out better than I expected.
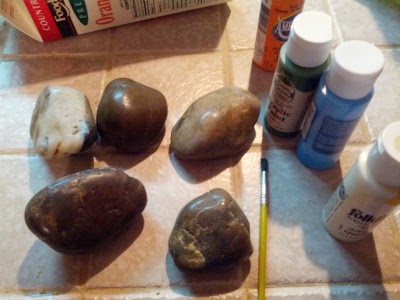
What you need:

- River rocks

- Acrylic paint

- Paintbrush

- Colored Sharpies

- Exterior ModPodge

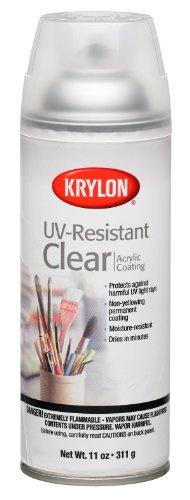
- Krylon clear acrylic coating spray

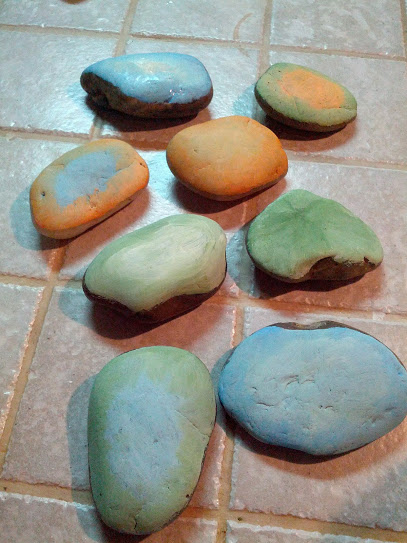
First paint a background on one side of the rock with acrylic paint. 

Then write the name of the plant in Sharpie.

Finally, paint on three coats of Outdoor ModPodge to seal it from the weather, spray with the Krylon clear coat to keep the ModPodge from getting gummy, and you're done!

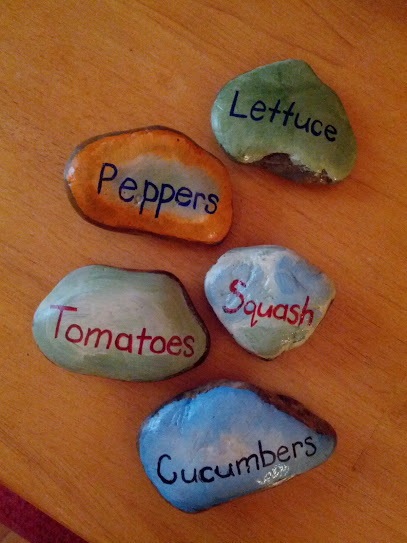
An easy and beautiful garden craft idea, just in time for Mother's Day!